


Mostrando postagens com marcador Como instalar Brushes e Texturas?. Mostrar todas as postagens
How to add brushes in Paint Tool SAI - In English

Before continuing... Make a backup from your Paint Tool Sai directory and the all files included. Because if you get an error or somethin went wrong, you'll can realocate the old files and use your first version of the software, the original.
Any doubt?? Contate-nos!
http://saibrasil.blogspot.com.br/2014/02/contato.html
Method 1
1 - Download de archive .zip
2 - Unzip the file .bmp and put it on the "blotmap" folder.
3 - Localize the executable "start-sai.exe" and double-click on it. Done!
4 -You can create from this executable a desktop shortcut. For that, go to the executable, click with the right button on it, choose "create a desktop shortcut" and you will see the icon on your desktop.
Método 2
Textures
1 - First of all, close the SAI and unzip the "Brushes.zip" file that includes all the brushes.
2- Copy the following files (pic down below) to the folder called "Brushtex" (Generally located in "C:/Arquivos de Programas/ Paint Tool Sai/Brushtex)

3- Open the file "Brushtex"(In SAI folder) as an editable archive (generally in the Wordpad) and type like this bellow:
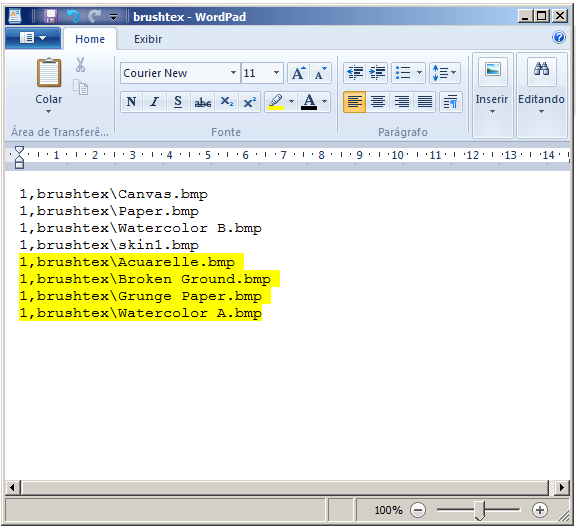
4 - Save the archive and open the SAI.


2- Copy the following files (pic down below) to the folder called "Brushtex" (Generally located in "C:/Arquivos de Programas/ Paint Tool Sai/Brushtex)
3- Open the file "Brushtex"(In SAI folder) as an editable archive (generally in the Wordpad) and type like this bellow:
4 - Save the archive and open the SAI.
The texture will be showed like this.
Done. Easy! Isn't?
Brushes Installation
1- In the same way, but the pencils (pic below) need to be copied in the elemap folder (Generally located on "C:/Programs and Folders/ Paint Tool Sai/elemap)
2- The archive which needs to be changed is called "Brushform". Rewriting like this:
Method 3
1. Open the Paint Tool SAI directory.
2. Open the file "NEWbrushform.conf" in text mode. Just right click the button and open it with the notepad windows .
3. In the document, copy all the lines and paste it on the same lines from into the "brushform.conf" original archive, in the Paint Tool Sai main folder .
4. Copy all the files to the "ELEMAP folder" and put them on the "elemap" folder in the Paint Tool Sai directory.
5. You will need to all the files to the "BLOTMAP folder" and put them on the "blotmap" folder.
6. Restart your system and you now all your new extentions will be ready for use!
Text and translation by: Thiago Henrique
Tutorials by: Thiago Henrique and the all PTSBR Community (PT-BR)
Tutorials by: Thiago Henrique and the all PTSBR Community (PT-BR)
[Tutorial] Como instalar brushes no Photoshop (Arquivos .ABR)
Olá artistas! Desenhando muito? Nesse tutorial, irei ensinar como instalar os brushes no Photoshop. É super fácil! Somente 3 passos.... vamos lá:
1- Abra o photoshop

----------------
2- Na aba onde seleciona os brushes, procure e clique na opção "Load Brushes..." (caso seu photoshop estiver em Português provavelmente estará escrito "Carregar Brushes..." )

-------------------------
3- Procure pelo arquivo .ABR e clique em 'Load'.

Pronto! O arquivo irá carregar em segundos e você já pode usar :)
Atenção: Na hora de baixar pacotes de brushes, certifique se a versão do seu Photoshop é compatível com arquivos .ABR. Certos arquivos foram desenvolvidos apenas para uma unica versão de PS, assim não conseguindo instalar em outras versões.
Como colocar Brushes no Krita?

Em duvidas? Nao pegou o jeito de como instalar seu pacote de Brushes e Texturas no Krita? Siga nossos passos e você vera como isto não passa do simples, rápido e fácil. Vamos descomplicar os passos!
Antes de mais nada certifique-se de criar um Backup antecipadamente dos arquivos que serão modificados, caso algo não ocorra corretamente, você poderá desfazer todo o processo, simplesmente copiando seu backup feito para o local de origem.
Alguma duvida? Contate-nos!
Antes de mais nada e preciso saber que o programa Krita funciona em dois sistemas diferentes, o KDE (Interface Gráfica para o Linux) e o Microsoft Windows (XP/Vista/7 e 8). Sabendo disso tudo ficara mais fácil, se você usa o Windows utilize o numero 3 para colocar os arquivos, em sequencia se você utiliza a plataforma KDE, procure pelo diretório usado no numero 2.
1 - Baixe e extraia os arquivos .zip ('Brushes' e 'Paintoppreset') na pasta onde esta localizado o programa Krita, geralmente em "C:/Arquivos de Programas...Krita".
2 - Linux (KDE) - Se usa uma plataforma 'KDE', utilize do seguinte diretório para "jogar" os arquivos: ": / home//.kde/share/apps/krita/."
3 - Windows - Se usa utiliza um sistema Windows, o caminho para o diretório a ser seguido sera este: " c:\Users\\AppData\Roaming\krita or c:\Users\\AppData\Local\krita" .
Link oficial Krita: http://krita.org/item/192-the-muses-preset-pack